Page 5 of 17
Re: ***Post Pics of what you are working on**
Posted: Sun Oct 08, 2017 12:51 pm
by Carnut1
What the death grip on a 1/2 horsepower grinder doesn't appeal to you? What could be more fun than that?
Re: ***Post Pics of what you are working on**
Posted: Sun Oct 08, 2017 9:44 pm
by hoodeng
I used air tools for many years and my hands used to ache after a days grinding due to the cold hand pieces , i switched over to electric in about 2003 and haven't had that hand issue since [i have developing hand issues though!].
But a word of warning ,electric hand pieces make a lot of torque ,where an air tool would stall when jammed the electric will try to wind your wrist off ,but i will say i did learn very early in the piece where not to lock a carbide, i also am very aware of how tight i clamp the carbides.
Some guys have pointed out the physical size and weight of the electric hand piece being a disadvantage over the lightness and maneuverability of an air tool ,these things are used differently ,where with an air tool you would hold with both hands and work the job ,with a larger electric piece you hold the fore shaft with both hands and rest the opposite end against your shoulder or chest whichever gives the best support for the angle you are attacking the job from , in this respect i am very lucky that the work i do is mounted on a shaft and rotated and tilted to a downward facing plane at all times .
I use two types of grinders , a Makita GD0810C reduction drive ,variable speed for carbide work and a Makita GD0800C direct drive ,variable speed for cartridge rolls etc. I was lucky enough a few years back to buy one of each hand piece new at a great price so there is a spare of each sitting in the cupboard ,,,as usual anything you have a spare of rarely fails .
I would like to thank Aaron from Advanced Performance Machining in Sydney, Australia ,who hosted David Vizard's three day seminar down here, very informative, covering things i have done for years but from a different perspective , you can teach an old dog new tricks!. Although David did notice my attention skills wane after a large BBQ.
Thanks again guys,greatly appreciated.
Cheers.
Re: ***Post Pics of what you are working on**
Posted: Mon Oct 09, 2017 1:22 am
by GARY C
PRH wrote: ↑Sun Oct 08, 2017 12:11 pm
Obviously, it's just a matter of what you're used to using..... But I can't imagine trying to port heads with a monster sized grinder like most of the electric ones are.
Mini air grinders for me.
Thats why I use a Foredom with a foot control and a cable operated hand piece. I like air but it's hard on the compressor.
Re: ***Post Pics of what you are working on**
Posted: Mon Oct 09, 2017 1:27 am
by GARY C
David Vizard wrote: ↑Sun Oct 08, 2017 11:15 am
Charlie,
I am about to invest in some new die grinders.Can you tell me exactly what you are using please??
Also if I szend them down to you can you train them so they produce the same results as you do???????????????????????????????????
DV
David, I have this Makita that I used on one runner and didn't like it, it is variable speed via a dial on the end of it, if you want to try it I will send it to ya, if you like it can have it if not you can pass it on to someone who does.
I like my foredom, it is much more manageable.
Re: ***Post Pics of what you are working on**
Posted: Mon Oct 09, 2017 6:07 am
by Carnut1
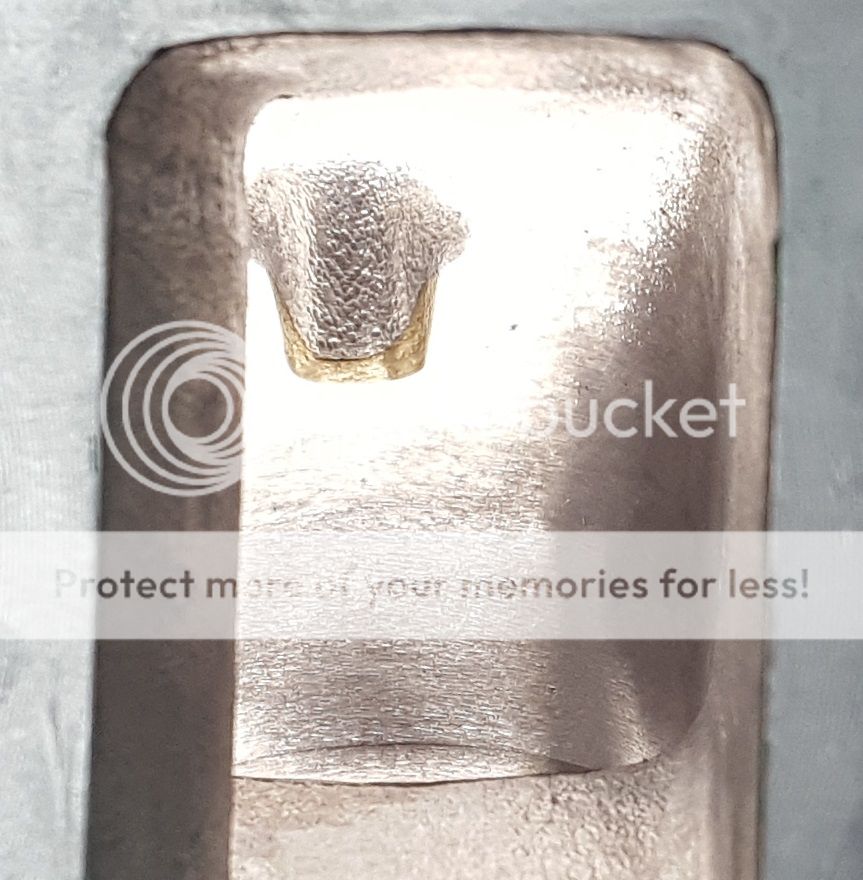
1008171849a_HDR-1_2.jpg
After some help and some deleting of postings I can return to posting. Expect old threads to be useless. Which sucks because I constantly find excellent old threads on this board. After seeing the valve surface treatment done by cnc I took a useless Chevy 1.94" valve and did a bit of burr work on it. Interested in some input with this trick. Thanks, Charlie
Re: ***Post Pics of what you are working on**
Posted: Mon Oct 09, 2017 12:06 pm
by Newold1
If one considers the boundary layer flow factor of air the roughing of the backside of any valve for improved air flow seems a bit suspect to me and I think the actual seat and throats improvements will yield more proof of better flow than trying to change direction and flow of air by lightly roughing a surface. If these methods with careful calibrated and confirmed flow testing and power improvement show meaningful or real usable improvements then I am all eyes and ears! Guess I still got a lot of Missouri in me!
Re: ***Post Pics of what you are working on**
Posted: Mon Oct 09, 2017 12:20 pm
by mag2555
David thank you very much for taking the time to run my posted flow numbers through your program and for your kind comments!
I got a bit side tracked for a few days with a side project, but when I finish a master Exh port I will pour the Intake port and take a measurement of the minimum port area.
These will go on a motor of about 408 to 410 cid and on the street in a 3200 lb car should be quite a dally driver hand full, lol!
By the way I have 3 of those Makita grinders and they last a very long time for the money and are a good weight for long grinding session's, too bad this model is not made any longer!
Re: ***Post Pics of what you are working on**
Posted: Mon Oct 09, 2017 12:35 pm
by GARY C
mag2555 wrote: ↑Mon Oct 09, 2017 12:20 pm
David thank you very much for taking the time to run my posted flow numbers through your program and for your kind comments!
I got a bit side tracked for a few days with a side project, but when I finish a master Exh port I will pour the Intake port and take a measurement of the minimum port area.
These will go on a motor of about 408 to 410 cid and on the street in a 3200 lb car should be quite a dally driver hand full, lol!
By the way I have 3 of those Makita grinders and they last a very long time for the money and are a good weight for long grinding session's, too bad this model is not made any longer!
This is the one I have and as far as I can tell it's still available, I think it replaced the earlier version that was liked by so many but I don't know how it compares.
https://www.summitracing.com/parts/mak- ... 2-_-makita
Re: ***Post Pics of what you are working on**
Posted: Mon Oct 09, 2017 3:35 pm
by kick2008a
Look familiar, our little 347 SBF in the 2017 EMC. From the intake carb flange to the bowl it was that texture, then transitioning to the 100 grit sand roll before the seat. I've been doing that on some heads for years. Anyone remember the Americas Cup boats, and when they put a texture on the bottom of the boat, smoked all the competition and it got outlawed. The texture stored water in the groves, water on water had low friction or drag.
Re: ***Post Pics of what you are working on**
Posted: Mon Oct 09, 2017 6:29 pm
by hoodeng
The difference between the early and late Makita that is sold here is that the late manufactured on/off switch in not latch able and has to be held in the on position whilst in operation ,which is hopeless for what we do. I sent both my new ones to the Makita distributor for SA and had the switches replaced with the early latching type, by doing this it will make it even more less likely that i will need them.
These are the ones i tried to attach to the earlier post.
Cheers.
Re: ***Post Pics of what you are working on**
Posted: Mon Oct 09, 2017 10:49 pm
by GARY C
Mine pushes forward and down and locks, but it is not an offset shaft. I wish the variable speed was in the trigger, not sure why they couldn't do that, they claim we can put a man on the moon but no variable speed trigger?

Re: ***Post Pics of what you are working on**
Posted: Tue Oct 10, 2017 12:19 am
by steve316
turn it on and leave it on. plug into a variable foot peddle and go to work.
Re: ***Post Pics of what you are working on**
Posted: Tue Oct 10, 2017 12:34 am
by GARY C
steve316 wrote: ↑Tue Oct 10, 2017 12:19 am
turn it on and leave it on. plug into a variable foot peddle and go to work.
I thought about that but this is much lighter and easier to handle plus it is already foot controlled.
Re: ***Post Pics of what you are working on**
Posted: Tue Oct 10, 2017 12:54 am
by 340king
This is my next project.
360 block.jpg
It is a 360 +0.010" Mopar small block. The original owner dropped the block and broke the front of the block off to include part of the deck. He used a chemical weld to hold it in place and raced it successfully for a couple of years and this engine has some 60 or so shows on it. It has held up rather well for what it is. I plan to weld up the broken block and put it back together. The plan is to drill out the cracked areas to remove the chemical weld and make what is more or less a weld rivet. I have a plan. Hopefully it works.
The reason for this amount of effort for a seemingly generic block is that the rules require less than 362 cubic inches. It is hard to find good enough blocks to clean up at +0.010", so saving this one is important. It is also a chance to learn more about a process I want to try. I will practice on the non-critical webbing before heading to the deck area.
360 block 2.jpg
Wish me luck!
Re: ***Post Pics of what you are working on**
Posted: Tue Oct 10, 2017 1:44 am
by kimosabi
Yesterday I decided the original L65 engine is gonna get some work done.

